")
A wet oil finish with an Ets 150/5
The Festool surfix oiler system, part 2
In the previous article on the new Festool oil system I produced a set of samples in both hardwood and softwood to see how easy it was to use the new oil system when following the instructions provided with the kit. Whilst the application method worked I wasn’t happy with having to leave the project for 8 hours between coats, so I thought I’d try the Festool oils using the wet burnishing method which I’ve used extensively with other oil finishes to see how good a finish would result.
For this test I’ll again be turning to my Ets 150/5 sander and the timber I’m using will be Sydney Blue gum for the hardwood sample and Baltic pine for the softwood.
The blue gum is recycled flooring and had already been sanded to about 120 g but the Baltic I have is in rough sawn boards; so once I’d dressed the Baltic,( by hand !) I was ready to begin.
In the Festool method that I wrote about in the previous blog, the samples were only sanded to 320g.
In the wet burnishing method we’ll be using both Festool Brilliant 2 and Titan papers and sanding up to 1500g. To achieve the best finish, It’s very important to remember the basic sanding rules relating to sander speed and grit size when using this method.
Use the table below as a guide to help select the appropriate speed for the grit your using.
Brilliant 2 Abrasives
Grit: Speed:
40. 6
60. 6
80. 6
120. 5
150. 5
180. 5
240. 4
320. 4
400. 3
Titan Abrasives
Grit: Speed:
500. 3
800. 2
1000. 2
1200. 1
1500 & finer 1
This chart is a suggested range only and results can vary depending on the type of timber that you’re using for your project.
If your using a Rotex sander remember to use the Rotex, random orbital technique as described in the “How do I get the best from my Rotex” article which is listed on the main page of this blog. If your using an ETS sander just work carefully though the progressive grades of paper paying close attention to the speed settings on the sander.
Once you’ve reached 1200 grit stop, as now we’re going to apply our first coat of oil. It you haven’t read my previous article on using the Festool oiler system, I’d suggest that you pause here and go back and have a look at it, particularly the section on loading and using the applicator pad.
Once you’ve chosen your oil and have the applicator pad set up apply an even coat of oil to the work piece. Try not to get too heavy a coat as repeated thin applications will give you a far better result than thick coats.
Once applied leave it for no more that 15 minutes then grab your sander with the sheet of 1500 grit Titan paper on it and , with the speed set to 1, begin to sand the surface of the work piece, gently and evenly working the oil into the timber. The small amount of heat generated by this process will open the pore of the timber allowing the oil to penetrate.
Work the oil into the timber for about 5 minutes ensuring that you cover all areas on the workpiece.
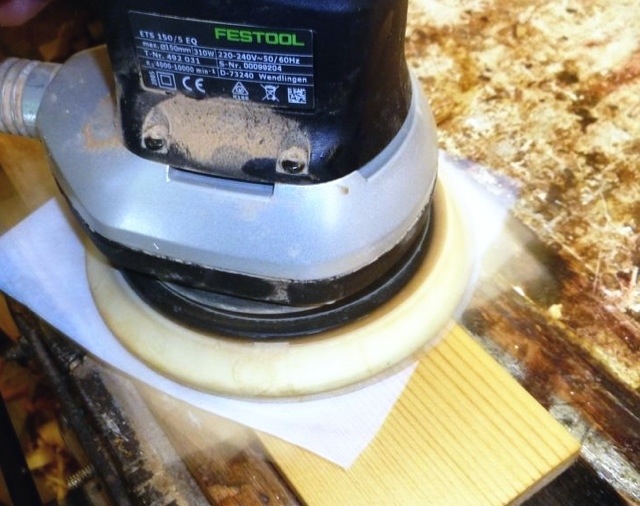
Once you’ve done this place a paper napkin on the workpiece, place your sander on top of the napkin, (don’t remove the abrasive) check that the sander is still on speed 1,then gently polish the entire surface of the workpiece. The napkin serves a twofold purpose in this technique. The abrasive properties of the napkin are around 6000 grit which serves to gently burnish the surface whilst the paper absorbs any excess oil from the work.
Put the piece aside for about an hour to give the oil more of a chance to dry then repeat the process from the oil application step, until you’ve achieved the level of finish you’re after.
I’d recommend a minimum of four coats of oil to achieve a good degree of protection , though the more coats you do, the better the final result.
Be sure to leave at least 24 hrs after application of the final coat of oil and give it a final buff using your sander and a paper napkin before you use your piece.
Safety note: Handle all materials with due care and be sure to clean up your work area and wash your hands properly when you have finished using these products. There is always a risk of spontaneous combustion of rags used in oil finishes if not stored correctly. Soak and rags used in water then dispose of in a bin outside your workshop when you’ve finished for the day.
Use all relevant personal protection equipment, ( safety glasses, hearing protection, etc) when using any of the techniques listed on this website.
Work safe, Have fun.
I hope you enjoyed this article and as usual, your comments and questions are always appreciated.
The next series of articles I’ll be posting will cover a the things you need to know about routers
Cheers
Bryan
