")
Dovetail keys as a timber joint. (Part 2)
In part 1 of this article, we covered the joining of the boards and the creation of the trenches for the dovetail keys. In this part well expand on cover how to cut the dovetail keys and glue them into the trenches.
One of the key points to remember is to cut the keys along the grain of the board to give maximum strength to the shelf.
As we’ll be using a trimmer to cut the keys, it’s critical that you pay careful attention to clamping the boards into place. In my case, the Sydney blue gum that I’m using is recycled tongue and groove floorboards, so I was able to screw a sacrificial board about 50mm in from the edge of my bench with the groove facing toward me, then screw an offcut of pine onto that for additional lateral support.
 It was then a matter of sliding the tongue of the board the key was being cut into, into the groove of the board screwed to the bench and the material was secured and ready to cut.
As i did in the previous article on sliding dovetails, I’ll be using the Bosch GMR trimmer to cut the dovetail keys. Once the keys are shaped, I’ll be using the band saw to cut the keys from the main board, then planing the cut edge of the board flat before clamping it back in the jig and beginning the whole process again.
The first step is to attach the fence to the trimmer. I’ve attached a piece of melamine to the fence to give the trimmer more support when used in the horizontal position. There is a notch cut out of the board to let me see the location of the cutter and to allow the wood chips to be ejected, so they don’t clog the cut.
Please use safety glasses or face shield plus a dust mask and earmuffs when using any router
We know that the height of the dovetail key is the same as the depth of the trench we’ve just cut, so now we need to reduce the dovetail keys to the correct width so they can be inserted into the trenches we’ve completed.
Set the fence, so it covers about 3mm of the cutter and, after checking that everything’s clamped and tight place the trimmer on the workpiece, turn it on and cut the first side of the tail.
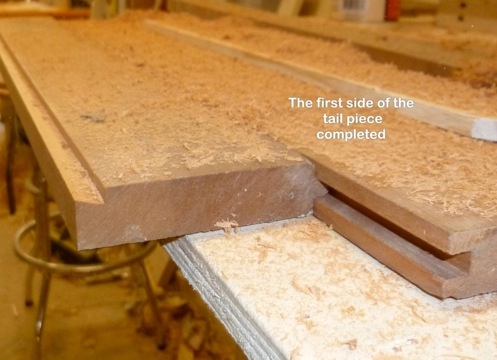
If you’ve never routed horizontally before make sure you have a go at doing a couple of test cuts first. The key points to remember are to keep the base of the rout pressed firmly against the edge of the workpiece and the fence pushed firmly down on the top of the piece.
Once you’ve cut the first side unclamp, then flip the piece over, re-clamp and cut the second side.
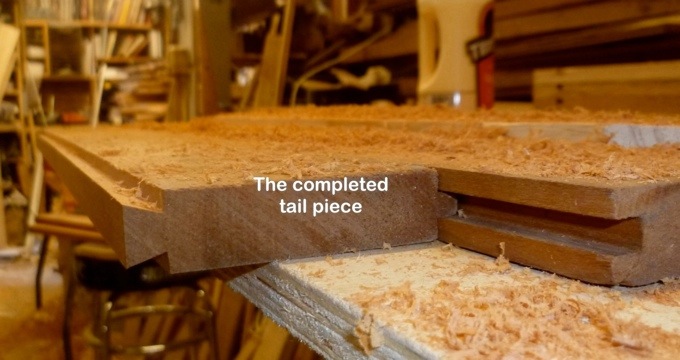 Grab one of the pieces with the trenches in it and see how it fits. If you’ve managed a perfect fit on the first cut, I take my hat off to you. If it’s too big just move the fence in by a small amount, then try again. This part of the process can be a bit tedious, but it’s necessary to get as tight a fit as possible.
Once you’ve achieved a nice firm fit, and by this I mean that the tail slides into the trench with a little effort but not so much that you need to whack it in with a mallet, firmly lock the fence on the trimmer into place, so you don’t lose the fence position.
The next stage is to free the tail from the workpiece and for this, I used my band saw. My workshop is small and I don’t have a table saw, so all of my rip cuts are done on the band saw then cleaned up with either hand planes or by doing a series of .5mm planing cuts on the router table.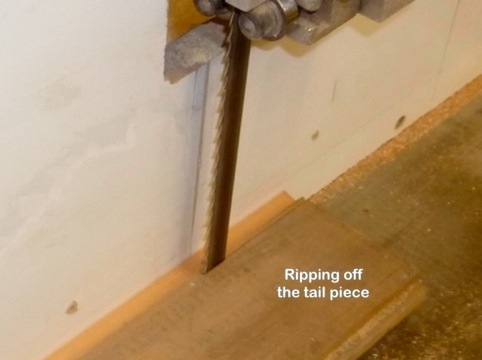
Since my tail needed to be a minimum of 6mm long, I set the fence on the band saw to 8mm and using a push stick removed the tails from the workpieces.

After removing the tailpiece from the main work board, I planed the edge flat to remove the tooth marks from the band saw and started the whole process again.
If you don’t have access to either a table or band saw you could also use a jigsaw or plain old handsaw to remove the tails from the main board.
Once I had everything set up it took me just over an hour to cut the 24 dovetail keys for the 12 shelves that I’d made.
Once all the tails were cut it was then just a simple matter of gluing them and sliding them into there corresponding trenches. I had a mallet handy to help “persuade” a few troublesome keys to get into the correct position.

I left the keys about 20mm oversize from each side of the shelf, planning to trim them flush when everything was dry.
After 24 hours drying time I used my Japanese saw to trim the excess keys flush with the edges of the shelves and then used a Stanley smoothing plane to trim the excess height from the keys, so they were flush with the shelves.
The next process was to place a 5mm radius cutter in the Bosch GMR trimmer and round over all the edges on the shelves to remove all the hard edges.
The next article in this series will show you my method of applying Tung oil to achieve a beautiful finish.
As usual, your comments and questions are appreciated
Thanks for reading this article,
Bryan


An awesome solution to jointing timber if you don’t have a Domino. Looks really neat as well.
I did however expertise some technical issues using this web site, since I experienced to reload the website lots of times previous to I could get it to load properly.
Hi Jones,
Ive had a look at the site and cant find any problems with images loading at my end. if the problem persists please email me at tutorwood@gmail.com with the information your’re after and i’ll send you the files as pdf documents.
thanks for reading
Bryan
This is a great tip especially to those new to the blogosphere.
Simple but very precise info… Many thanks for sharing this one.
A must read article!
Very nice post. I just stumbled upon your weblog and
wanted to say that I have really enjoyed surfing around your blog posts.
After all I’ll be subscribing to your rss feed and I hope you write again very soon!
excellent publish, very informative. I ponder why the
other specialists of this sector do not notice this.
You must proceed your writing. I’m sure, you have a huge
readers’ base already!
Hey! Would you mind iif Ishare your blog with my twitrter group?
There’s a loot of folks that I think would really enjoy your content.
Please let me know. Cheers
Please do,
Cheers B
Excellent post! We will be linking to this great post
on our site. Keep up the great writing.