Showcasing the work of Tim Coles

Hi All

Working as a retail tool specialist I’m fortunate to meet a lot of fellow woodworkers and am often asked for advice on various aspects of the projects they’re working on. One of the things I really enjoy is seeing how those projects turned out.
I received a lovely email a week or so ago with some pictures of a major commission project which one of my customers had just finished.

With his permission I’ve copied it here;

Brian,

A few months ago, I called into the shop and you gave me a hand with some
sanding stuff. m

You asked me to send you some pictures of my last job, and I’ve finally
got around to it.

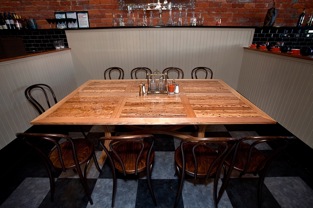
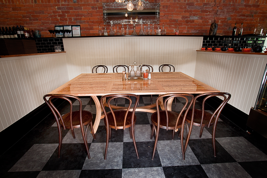
I did the timber work for a cafe fit out…check out Mister Raymond, Sale,
on Facebook.

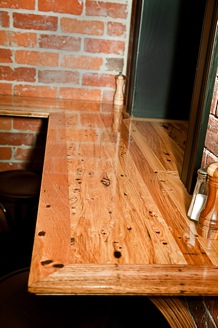
The table and benches are from Birdseye Stringybark, filled with West
Systems 207 special clear epoxy and then finished with Wattyl 7008 and
finally buffed with a paste wax. The table top was finished with my Rotex
150.

The sander is of course like nothing else I’ve used…and I’ve burnt out
one Makita and two Metabo random orbital sanders, each in about 12-18
months. One of the big advantages from the perspectives of the owners was
that I was able to do the final sanding and finishing of all the benches
in situ, thanks to the excellent dust collection of the Festool setup,
something they wished some of the other tradies would have used.

The bentwood laminations underneath the table and benchtops were from
recycled local timbers, including the falling down cattle yards next door.
And the Rotex even had a role in their finishing.

Thanks for your support and encouragement, when I get a bit more
cash-flow, don’t worry, you’ll be seeing me… First on the list is the
TS-55, then the T-18……..

Tim

The pictures Tim sent me are shown below.

Please enjoy them and if you want to see some more of Tim’s excellent work the link to his website is here.  http://timcoles.com.au/

tim 2

tim5tim 7

tim3


tim 1tim8tim6

Well done Tim for some outstanding work!!!!

If any other up and coming woodies in the Tutorwood community would like to see their work showcased on the Tutorwood site, i’d love to hear from you. particularly if you’ve used some of the techniques listed on the site. Drop me a line and send some photos to  tutorwood@gmail.com

As always, be safe and have fun.

Cheers

Bryan

The Festool APS 900 Jig, making a masons mitre joint.

image


The Masons Mitre,

With its roots in stone masonry the masons mitre joint has evolved a commonly used joint in kitchen renovation where it is used to join bench tops together at a 45 degree angle

The masons mitre was originally used where two stone members met at a 45 degree angle and it was created by removing a small section of material from one part, thereby creating a socket for the other.
In masonry terms, this allows the bond of the masonry courses to to continue around a corner without a staggered vertical joint and and allows the mortar to truly bed into the corner of the joint.

In the cabinetmakers world the masons mitre allows for a strong and attractive joint, particularly on bench tops with rounded edges, and saves on the wastage of materials and additional labor costs that would result from the removal of large triangular sections that need to be cut in a traditional mitre joint.

The masons mitre joint can be a it of a challenge, but with a bit of practise and good jig for your router it’s quite achievable.

One of the best jigs I’ve used to achieve this joint is the APS 900 jig which is made by Festool. Whilst it looks a bit complex it’s actually fairly straight forward and gives you accurate and repeatable results.

Have a look at the video here from Festool TV where Festool demonstrator Frank Jaksch shows the how to use the APS 900 along with a Festool OF 2200 router to create a masons mitre joint.

It is dubbed in English and the picture is a bit dodgey at times but please persist, it is worth watching.

Anyways guys, I hope you enjoyed the video and if your not using it already, will soon be adding the masons mitre to your arsenal of joinery.

Thanks for reading and as always your comments and feedback are appreciated.

Be safe and have fun,

Cheers

Bryan

20130705-101513.jpg

Fitting an I.A.S module to a CT26 Extractor

Hi Everyone,

The opportunity came up last week for me to fit a IAS module to a CT26 extractor so I thought, as it’s a very uncommon request i’d take some photos to show you  how it’s done. For those of you who are scratching their heads and wondering what the hell i’m talking about, let me take a moment to explain.

The IAS, (integrated air supply)  module is part of Festool’s pneumatic sanding system and allows you to hook up a air operated sander to your CT 26 or 36 extractor for tool actuated pneumatic sanding. Once the module is installed you can decide on wether you go the hole hog and use the Festool IAS adapters and hoses  which connect to the LEX range of Festool Pneumatic sanders or simply connect an airline to the port on the extractor and use the the standard CT hose to connect to your non Festool air sander.

The beauty of the Festool system lies in the IAS hose. It is a complete unit which incorporates a central air line in which is surrounded by another hose which removes the excess air. Both of these hoses are encased in a 36mm antistatic hose which removes the sanding dust from the sander.

My client had been given a LEX 150/7 sander so he opted for the whole Festool setup.

Have a look at the photos for the set up process.

ct26ias.1

ct26ias.2

ct26ias.3

ct26ias.4

ct26ias.5

ct26ias.6

ct26ias.8ct26ias.7

Whilst primarily designed for the automotive industry my client, who’s a furniture finisher is using the sander with a great deal of success as a coarse sander to cut back rough surfaces on timber slabs  prior to finishing with his electric sanders.

If you’re thinking of going this way just keep two thing in mind; firstly, for air sanding operations you need a big air compressor. The module does not turn the extractor into an air compressor, (and yes i’ve been asked on more than one occasion). The second thing to take into consideration is the cost. it’s bloody expensive.

As always guys, thanks for reading. Your questions and comments are always appreciated.

Be safe and have fun!

Cheers

Bryan

Site Update, it’s now easier to find stuff!!!!

Hi All,

Well, a couple of things to cover today. Firstly, the Festool sale at Just Tools last Friday and Saturday went gangbusters. I’m off work today with a rotten dose of the Flu so I havent seen the final wash up but I reckon that close to 100 tools went out through the door and over the web during the two day period. It was good to catch up with everyone and on behalf of the sales team at Just Tools I’d like to say thanks for your support.

I’ve updated the theme on the site today which will make it a bit easier to track down particular articles. If for instance you’re looking for information on the Rotex, click on the “about” button and on the right side at the top there’s a category header with a drop down list showing all the article categories on the site. Click on the Rotex Tab and all articles on the Rotex will be listed.

When viewing the site on a mobile device the category list is at the bottom of the “about” page.

Please let me know if you like the new format, I’d love to hear your feedback.

Anyway guys, Ive got lots more articles in the pipeline so watch this space.

As always, be safe and have fun,

Cheers

Bryan

Sharpening Hints


One of the more common questions I get on a weekly basis in the shop has to do with the best was to sharpen hand tools. We have the Tormek T7 and T3  sharpening systems the shelf and whilst they’re excellent units, the price does end to put a lot of people off.

I’m a hand sharpener and use a combination of diamond plates, Japanese water stones and a leather strop to sharpen all my chisels and hand plane blades.

If I’m reworking a very dull chisel I’ll usually start with a coarse diamond plate of around 320 grit which is particularly good for removing any nicks or small chips from the blade.
I’ll then move up to a 600g, then an 800 plate, 1200 plate and a 2000g plate. From there I move up to a 4000g Japanese water stone and then finish with a leather strop dressed with honing compound. At every stage of sharpening I always sharpen the bevel, then flip the tool over and flatten the back.

I find that this process gives me a uniform mirror finish on the tool which stays sharp for a long time,( depending on the timber).

The biggest issue nearly all of us have had when learning to sharpen is to figure out the best way to set the angle of the chisel or plane blade so that we can get accurate and repeatable results. There are a mountain of jig systems available to help you set the angle but I’ve found that a simple jig which you can make up yourself offers one of the best and most cost effective solutions available.

The plan for the Deneb Puchalski Angle Setting Jig features on the Lie Nielsen Australia website, but for convenience you can click here for a direct link to the plan and here for a direct link to the really useful Lie Nielsen sharpening guide.

As always your questions and comments are appreciated.

Be safe and have fun

Cheers
Bryan

Festool Domino DF 700

Hi All

For those readers who have either purchased or are contemplating the purchase of the new Festool Domino DF 700, I’d highly recommend that you click here, to download the supplamental manual for this awesome machine.

The manual, which was commissioned by Festool USA offers a clear and concise overview of the  DF700  and will make it a lot easier to understand all the functions of the machine.

Hope you enjoy and as always, your questions and comments are appreciated

Be safe and have fun,

Cheers,

Bryan

Hand Tool Event

Hi Guys,

This is just a quick post to let all of my Victorian readers know that Lie Nielsen Tool works, (Australia) is holding a major hand tool event this weekend, the 21st and 22nd of April.

its being held in the Furniture workshop at Holmesglen Tafe, Gate 3, Building 5 Batesford road Holmesglen.

For more info please click here to go to the Lie Nielsen Australian website.

As well as Lie Nielsen there will be stalls from Chris Vesper, Philip Ashby and the Hand Tool Preservation Society.

Hope to see you there,

As usual, be safe and have fun

Cheers

Bryan

How to get the most from your Festool OF1010 Router

The Festool OF 1010 Part 1


Hi Guys

Well, here’s the first part of the series of router articles that I’ll be uploading over the next few weeks.

The articles will be quite comprehensive, so on machines where there are lots of features to cover I’ll break them up into two parts. Part 1 of the OF1010  covers the basics and details all of the important parts up to the depth stop mechanism.

Part 2 which should be up next week will cover using the depth turret, copy rings, changing bases and accessories. I’ll also be including practical exercises which will give you an idea of how to create some common joints with the  OF1010.

I’m working on a series of articles which will cover template routing and how to make things such as hinge jigs and other useful jigs. Before these articles are uploaded I’ll be covering the features, functions and ideal applications of a number of popular routers and trimmers on the market. Please take the time to read these as they’ll all help to give you a greater understanding of how your machine works. Before you can begin to get the most from your Router you need a thorough understanding of all its features and functions.

Drop me a line if you have any questions about specific machines and as usual, your questions and comments are always appreciated.

to read the full OF1010 article please click here  Getting the most from your OF1010

Have fun and be safe,

Cheers for now

Bryan


The New Dewalt 18v Cordless

New beginnings for Dewalt.

Hi All,

I recently had the chance to have a good play with the new cordless hammer drill, drill driver and impact driver from Dewalt.

As one who wouldn’t normally touch the brand due to the turbulent relationship that we’ve had in the past, I was more than surprised by how good these new tools are.

Read my full article here, Is this the new Dewalt, and as always, stay in touch and let me know if you have any thoughts or comments on the article.

Cheers for now,
//
Bryan

The New Festool Oiling System


Festool Oiling System

Hi Guys,

I’ve finally had a chance to have a play with the new Festool Surfix  Oiling System  and I must admit that I was very happy with the result.  It’s perfect for the serious DIY user to get a taste of  traditional oil finishes and I’m certain the quality of the finish will appeal to more seasoned woodies.

If you follow the link above it will take you to the PDF handout I wrote which breaks down Festool’s “unique” instructions into a more user friendly format.

I tested the oils on Baltic Pine and Redgum using both the Festool method which recommends leaving the oils to sit on the workpiece for 6 to 8 hours, and my own method in which I sand up to 1500 grit with an ETS 150/5 , then wet burnish in the oil.

If you want more info on wet burnishing oil finishes either place a comment or send me an email and I’ll write a post detailing the method.

As always your comments are appreciated.

Cheers for now

Bryan


Create a free website or blog at WordPress.com.

Up ↑