Protool UniverS SSP 200 EB, Sword saw

Hi All,

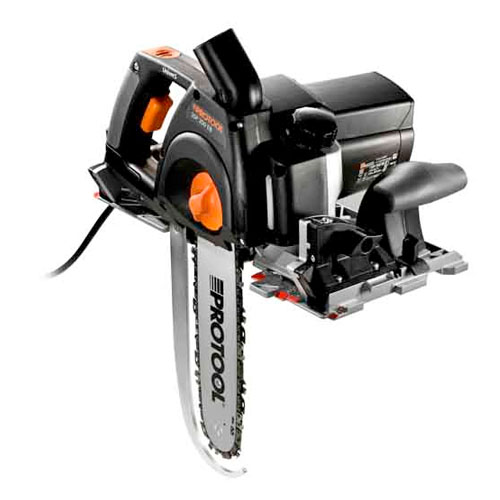
Today we’re going to have a look at a relatively new tool from Festool’s sister company Protool. The SSP 200 EB is a bit of an unusual beastie and I remember the the first time  saw it I was a bit perplexed by it.

The SSP is in essence, a chain saw that’s mounted onto a circular saw base. It has a  maximum cutting depth of 200mm (about 8 inches) and it runs along standard Festool or Protool, guide rails for accuracy and ease of cut.

Its not a tool that you have to have but if you’re regularly cutting sleepers, timber beams, or LVL, (laminated veneered lumber) boards or girders, the SSP is guaranteed to make your life easier

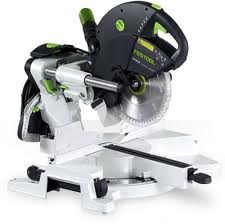
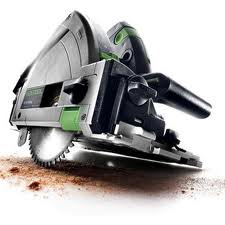
Designed for cutting large beams the SSP which weighs in at only 6.5 KG ( 14 Pound) is a lot easier and safer option than circular saws with a comparable cutting depth such as the Protool CSP 165 which weighs in at 22kg, (48 pounds)

The CSP 165E

I’ve used both the CSP 165 and the SSP extensively and, personally i’d now always choose the SSP over a large and heavy circular saw.

When docking beams to length with the SSP you can tilt the blade forwards at a 10 degree angle which exposes more blade to the timber and gives you a proportionately faster cut. The maximum mitre angle on the SSP is 60 degrees and when used on a guide rail will pivot on the scribe line in the same manner as a TS 55 or TS 75 will.

Lets have a look at the features of the SSP;

1, Blade,

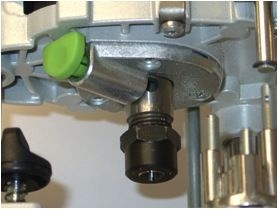
2, Fast Fix Blade Changing

3, Guide Slot for Guide Rail

4, Mitre Angle indicator

5, Tool less chain tension adjustment

6,Tool Less chain lubrication

7,MMC, (constant speed under load) electronics

8, Bar oil level indicator

9, Dust Extractor Connection

10, Auxiliary Handle

11, Clearly visible cut indicator.

Not being a major fan of chainsaws, I must admit to being a bit nervous when using the SSP for the first time but, within 5 minutes I was as happy as a pig in …….., and had chopped up a large beam into small pieces before I realised it. When connected to a CT26 dust extractor,  with the 36mm hose about 2 thirds of the dust was collected leaving only a relatively small amount to clean up.

Click below to watch a video of the SSP in action.

As you can see from the video there is plenty of different applications for the SSP. Ive used it on both softwoods an Australian Hardwoods and found that it didn’t struggle with either of them.

No review of the SSP would be complete without giving you the chance to watch the Official Protool film on the SSP. Its the first Big Budget advert for a power tool that I can remember seeing in a long time.

Enjoy !!!!!

Well I hope you enjoyed that.

As always, your comments and questions are appreciated.

Be safe and have fun

Cheers,

Bryan

Kapex, KS120 Lasers,


Hi Guys,

Well I’m into my second week of being home on sick leave and now that I’m feeling a bit more human I thought I’d take the time to sort out some of the photos on my computer left over from my time at Festool.

I came across this one which I used to use when teaching classes on the Kapex. It was taken in the service centre at Festool and shows just how wrong the  dual lasers on a Kapex can go when a  well meaning tweak of the laser adjustment screws goes wrong.

Thats all for now,

As usual, your comments and questions are always appreciated.

Keep safe and have fun,


Bryan


The TS55R, More Info

Hi All,

I was sent this video about the new TS55-R which gives more information about the new features on the saw.
I particularly like the new riving knife, splinter guard / blade window and the new depth adjustment lever which automatically allows for the guide rail.
its been put together by the guys at intelligent workshop in the UK. Click here to view their site, its worth a look

Enjoy!!

Any comments or questions are appreciated as alwaya.

Be safe and have fun.

Cheers

Bryan

The New Festool TS55R Plunge Saw

Hi All,

I just came across this video on You Tube of the new TS55 R plunge saw from Festool and in the spirit of all things woody, had to share.


Watch The Video Here


I don’t have any eta for its arrival in Australia at this stage but stay posted and i’ll keep you up to date. We have a Festool Demo afternoon and sale between 3pm and 7 pm this coming Tuesday April 3rd so i’ll see what I can find out.

Have fun and be safe

Cheers

Bryan

How to get the most from your Festool OF1010 Router, (Part Two)

Hi All,

Sorry its taken a couple of weeks for me to get part two of the  Festool OF 1010 series posted, but I  was floored with a dose of Flu.

In Part two we’ll further explore this great little router , showing how to insert a cutter and  focusing on the depth turrets which, from experience, seem to give people a lot of trouble.

Don’t be put off reading this article if you don’t own a Festool router as virtually every plunge router on the market will have a similar depth turret adjustment system, and the information in the article can easily be transposed between brands.

Please click here, Of 1010 Part 2  to read the full article.

In Part three we’ll  look at the accessories which can be used with the OF1010, including the Guide rail sets, accessory bases and copy rings

I hope you enjoy the article and as always, your comments and feedback are appreciated.

Articles in the pipeline include, how to make templates and use copy rings, the Festool 1400 and 2200, the Bosch GMR trimmer and a review of the new Dremel Saw-Max if I can get my hands on one.

If you have any questions on any of the information in this article, or if you’ve got any router or woodwork questions you can contact me via email or post a comment and I’ll get back to you as soon as possible.

Have fun and be safe

Cheers for now….

Bryan

How to get the most from your Festool OF1010 Router

The Festool OF 1010 Part 1


Hi Guys

Well, here’s the first part of the series of router articles that I’ll be uploading over the next few weeks.

The articles will be quite comprehensive, so on machines where there are lots of features to cover I’ll break them up into two parts. Part 1 of the OF1010  covers the basics and details all of the important parts up to the depth stop mechanism.

Part 2 which should be up next week will cover using the depth turret, copy rings, changing bases and accessories. I’ll also be including practical exercises which will give you an idea of how to create some common joints with the  OF1010.

I’m working on a series of articles which will cover template routing and how to make things such as hinge jigs and other useful jigs. Before these articles are uploaded I’ll be covering the features, functions and ideal applications of a number of popular routers and trimmers on the market. Please take the time to read these as they’ll all help to give you a greater understanding of how your machine works. Before you can begin to get the most from your Router you need a thorough understanding of all its features and functions.

Drop me a line if you have any questions about specific machines and as usual, your questions and comments are always appreciated.

to read the full OF1010 article please click here  Getting the most from your OF1010

Have fun and be safe,

Cheers for now

Bryan


A Cautionary Tale..

I’m a major fan of Christopher Schwartz’s, lost art press blog and was amused, if that’s the correct word, to read of his nasty encounter with black walnut, (see, The Nasty Nut).
It reminded me of how I developed a healthy distrust of white and red cedar.

It happened back in September 2008 whilst I was working at the working wood show in Canberra. After discussions with the dealer we were doing the show with, our focus for this event was demonstrating the new Vac Sys vacuum clamp system as well as the Rotex and ETS sanders.
From previous shows i’d done earlier in the year I found the the best way to demonstrate the Vac Sys was to fix the Vac Sys to a MFT 3 table then put a slab of timber, borrowed from one of the timber merchants at the show, then use the rotex to sand and polish the slab to a mirror finish. ( See blog on “how to get the most from your rotex” for the technique)
It was a mutually beneficial arrangement as we had a continuous supply of timber to demonstrate on and the timber merchant got a finished slab he could sell for a higher price.
Well, once the test centre stand was set up I went to explore the timber area and soon met up with the boys from Cedarworks in NSW who agreed to let me use their timber. I’d never used this technique on cedar before and was interested in how it would work.
The show began on the Friday which was a blur of sanded boards, and demonstrations. The cedar finished beautifully using the rotex though as the day progressed I found that the 1200 and 1500 grit titan abrasives used in the final stages of the demonstrations weren’t lasting as long as they normally did with hardwoods.

Should’ve paid a bit more attention to this.

Saturday again passed quickly with more boards polished and plenty of sander sales. Started to feel a bit funky that night with my left eye now beginning to feel decidedly gritty and starting to look a bit bloodshot.

Also should of paid more attention to this!

Woke up Sunday morning feeling, well, decidedly crook, with the left eye leaking green goo and the right eye turning a bit red.
I gathered my self together and figured that as my flight home was booked for Sunday night and I’d have no hope of getting home earlier, I may as well go to the venue and do the rest of the show.
Well, you know how when you’ve got commitments to fulfill and you psych yourself up; I did all that and was not feeling too bad when I left the hotel and got to the venue. The eyes were a bit blurry but I could deal with that.
My efforts in talking myself up were rendered futile when I arrived at the venue and was confronted by colleagues, and the dealer staff whose comments of, ” what happened to your eyes” and “Oh you look terrible” really helped to make me feel better.
Anyway, I managed through the rest of the show, packed up and got to the airport to find my plane was delayed for an hour.

This weekend just keeps getting better!!!!

Went to the bathroom to check things out before I got on the plane and was a bit surprised at how revolting I looked. Both eyes were now really bloodshot and leaking green goo.
It now made sense why everyone had been giving me a wide berth at the airport.
I tried to make myself a bit more presentable, then after about another half an hour, got to my seat on the plane.
Got myself comfortable, then was tapped on the shoulder by the hostie who wanted to check if I had seatbelt on. She took one look at me, her smile disappeared then she hurried off to get the cabin supervisor.
After reassuring them I was well enough to fly I eventually got back to Melbourne and managed, more by good luck than good management to drive myself home.

Just after midnight I walked in the front door at home and was greeted with a horrified expression on my wife’s face,( that’s never good). Both eyes were now oozing copious amounts of green goo, were swollen, bloodshot and bleeding from the corners.

My lovely wife grabbed her keys and took me straight to the eye and ear hospital in the city.
After a few hours of tests the verdict was that I had developed a severe bacterial infection from the fine cedar dust which had also scratched both eyes.

The end result was 2 weeks off work with bucket loads of eye drops. I was fortunate to make a full recovery but I’m very aware that things could have been a lot worse.

So what happened.
Well, during my two week recuperation I has a good deal of time to go through the events and see if I figure out where the weekend went pear shaped.
I performed all demonstrations with full dust collection which collected pretty well everything until I hit the 1200 grit and 1500 grit Titan papers. When you sand above 400 grit the swarf you make is classified as “flour” rather than dust. The finer the grit the finer flour. One of the characteristics of Titan papers is that over 1200 grit there are no holes for dust collection. So the flour I was creating was staying on my hands which I then transferred to my eyes when I inadvertently wiped my eye or touched my face.
The problem was compounded by sanding cedar slabs for almost three solid days.
My doctor also advised me at a later appointment that under magnification they found that the particles of cedar flour they had examined were quite sharp rather than being rounded like most timber flour. This probably also explains why my papers weren’t lasting along.

I leant my lesson here and during later demonstrations had a tack cloth handy to contain the flour when sanding above 1200 and I also had a bucket of water handy to rinse my hands in to remove any residue of the flour.

I still work with cedar, albeit a lot more carefully and I’ve had no further problems.

Anyway everyone; have fun and work safe.

Cheers

Bryan

The Festool Surfix Oiler System, (Part 2)

20120111-065458.jpg

A wet oil finish with an Ets 150/5

The Festool surfix oiler system, part 2

In the previous article on the new Festool oil system I produced a set of samples in both hardwood and softwood to see how easy it was to use the new oil system when following the instructions provided with the kit. Whilst the application method worked I wasn’t happy with having to leave the project for 8 hours between coats, so I thought I’d try the Festool oils using the wet burnishing method which I’ve used extensively with other oil finishes to see how good a finish would result.

For this test I’ll again be turning to my Ets 150/5 sander and the timber I’m using will be Sydney Blue gum for the hardwood sample and Baltic pine for the softwood.

The blue gum is recycled flooring and had already been sanded to about 120 g but the Baltic I have is in rough sawn boards; so once I’d dressed the Baltic,( by hand !) I was ready to begin.
In the Festool method that I wrote about in the previous blog, the samples were only sanded to 320g.
In the wet burnishing method we’ll be using both Festool Brilliant 2 and Titan papers and sanding up to 1500g. To achieve the best finish, It’s very important to remember the basic sanding rules relating to sander speed and grit size when using this method.
Use the table below as a guide to help select the appropriate speed for the grit your using.


Brilliant 2 Abrasives

Grit: Speed:
40. 6

60. 6

80. 6

120. 5

150. 5

180. 5

240. 4

320. 4

400. 3


Titan Abrasives
Grit: Speed:
500. 3

800. 2

1000. 2

1200. 1

1500 & finer 1


This chart is a suggested range only and results can vary depending on the type of timber that you’re using for your project.
If your using a Rotex sander remember to use the Rotex, random orbital technique as described in the “How do I get the best from my Rotex” article which is listed on the main page of this blog. If your using an ETS sander just work carefully though the progressive grades of paper paying close attention to the speed settings on the sander.

Once you’ve reached 1200 grit stop, as now we’re going to apply our first coat of oil. It you haven’t read my previous article on using the Festool oiler system, I’d suggest that you pause here and go back and have a look at it, particularly the section on loading and using the applicator pad.
Once you’ve chosen your oil and have the applicator pad set up apply an even coat of oil to the work piece. Try not to get too heavy a coat as repeated thin applications will give you a far better result than thick coats.
Once applied leave it for no more that 15 minutes then grab your sander with the sheet of 1500 grit Titan paper on it and , with the speed set to 1, begin to sand the surface of the work piece, gently and evenly working the oil into the timber. The small amount of heat generated by this process will open the pore of the timber allowing the oil to penetrate.
Work the oil into the timber for about 5 minutes ensuring that you cover all areas on the workpiece.
Once you’ve done this place a paper napkin on the workpiece, place your sander on top of the napkin, (don’t remove the abrasive) check that the sander is still on speed 1,then gently polish the entire surface of the workpiece. The napkin serves a twofold purpose in this technique. The abrasive properties of the napkin are around 6000 grit which serves to gently burnish the surface whilst the paper absorbs any excess oil from the work.
Put the piece aside for about an hour to give the oil more of a chance to dry then repeat the process from the oil application step, until you’ve achieved the level of finish you’re after.
I’d recommend a minimum of four coats of oil to achieve a good degree of protection , though the more coats you do, the better the final result.
Be sure to leave at least 24 hrs after application of the final coat of oil and give it a final buff using your sander and a paper napkin before you use your piece.

Safety note: Handle all materials with due care and be sure to clean up your work area and wash your hands properly when you have finished using these products. There is always a risk of spontaneous combustion of rags used in oil finishes if not stored correctly. Soak and rags used in water then dispose of in a bin outside your workshop when you’ve finished for the day.
Use all relevant personal protection equipment, ( safety glasses, hearing protection, etc) when using any of the techniques listed on this website.
Work safe, Have fun.

I hope you enjoyed this article and as usual, your comments and questions are always appreciated.

The next series of articles I’ll be posting will cover a the things you need to know about routers

Cheers

Bryan

The New Festool Oiling System


Festool Oiling System

Hi Guys,

I’ve finally had a chance to have a play with the new Festool Surfix  Oiling System  and I must admit that I was very happy with the result.  It’s perfect for the serious DIY user to get a taste of  traditional oil finishes and I’m certain the quality of the finish will appeal to more seasoned woodies.

If you follow the link above it will take you to the PDF handout I wrote which breaks down Festool’s “unique” instructions into a more user friendly format.

I tested the oils on Baltic Pine and Redgum using both the Festool method which recommends leaving the oils to sit on the workpiece for 6 to 8 hours, and my own method in which I sand up to 1500 grit with an ETS 150/5 , then wet burnish in the oil.

If you want more info on wet burnishing oil finishes either place a comment or send me an email and I’ll write a post detailing the method.

As always your comments are appreciated.

Cheers for now

Bryan


Working With Wood Show, Melbourne 2011. Day 1

Well it’s here again. It doesn’t seem like 12 months has passed since the last gathering of the wood brethren in Melbourne but here we are.

Today is set up day, which usually means a 12 hour day lugging power tools into position, hanging accessories and trying to decide if we’ve actually bought the right mix of stock.
In a rare feat of brilliance, my boss decided that well do the show this year with Bosch and fein as well Festool who we usually exhibit with.
For you guys out there after a bargain, there will be some good ones to be had.
As I have a chance to explore the show over the next few days I’ll keep you updated with any blog worthy new products including the brand spanking new cordless Fein multi master.

Anyway that’s all for today, as usual feel free to ask question or post comments

Cheers

Bryan

I’ve added a few

Create a free website or blog at WordPress.com.

Up ↑