Calibrating The TS55R Blade

Five Minutes With Festool – The TS55

Let’s assume that we’ve just had a blade sharpened and we need to check the calibration between the cutting depth and the depth scale. Remember that when a  saw blade is sharpened, you invariably lose a small amount of the blade diameter. After one sharpen it may not be noticeable, but after two or three sharpens there can be a  variation in your cutting depth.

 This method can also be used to fine tune the cutting depth if you’re using the saw on a different brand of guide rail, (not that I’d recommend that), as there can be a variation in the standard 5mm thickness between brands. 

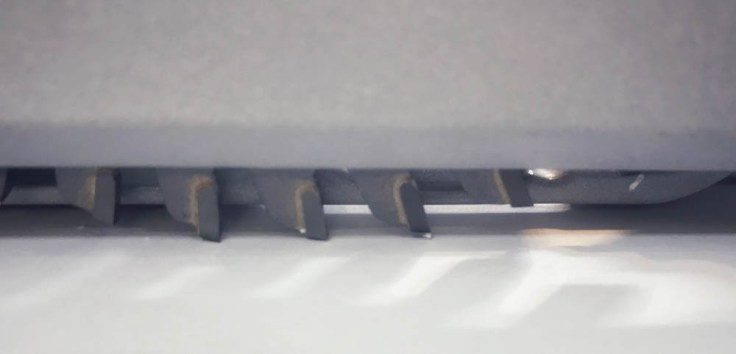
To calibrate the blade on a TS55R, place the base of the saw on a piece of paper (A4 copy paper is ideal), on a  flat, smooth surface and set the depth guide to zero. As we’re not on the guide rail make sure you use the unmarked indicator rather than the FS indicator.

Set To Zero
Depth Gauge set to zero. Note the blade calibration knob to the right of the FS mark.
plunged
Fully Plunged, note the plunge stop resting on the calibration knob.

Once set, gently plunge the saw down until it stops and look to see if the tips of the blade are touching the paper

Blade too high
Blade too high

Adjust by turning the calibration knob on the top of the saw until the tips of the blade just touch the piece of paper and you’re done.

Blade Set
Blade set correctly


A good habit to get into is to periodically check this to make sure that your TS55 is working at its best at all times. 

I hope you found this “Five minutes with Festool” useful and as always your questions and comments are appreciated.

Have fun and be safe,

Cheers

Bryan

Festool, technique, training, TS55R, cool tools, blades, woodwork, power tools,

ETS EC 150 Festool Brushless Sanders

Hi All,

Recently released in Europe Festool’s new  sanders the ETS EC 150/5 and ETS 150/3 are sure to be a hit when they reach the Australian market. With the latest in EC brushless motors these sanders have a host of new features to make the onerous task of sanding quicker and easier.

images

Some of the new features are a vibration sensor which automatically adjusts the sander speed when not under load to protect the user from excess vibration, constant speed under load, and a suction detection system which stops the sander if the dust extractor hose comes out, (this feature can be deactivated if you’re using a dust bag).

The new sanders have a height of 113mm including pad, compared to 185mm on the old ETS sanders and a weight of 1.2 kg which is 600 grams lighter than the old ETS sanders

Have a look at the video below to see the ETS EC 150 in action and watch for a cameo appearance by Blair, one of the principals  of Festool Australia

Please watch this space and as more information comes to hand I’ll post it here

Be safe and have fun

Cheers

Bryan

The Profi Scale Moisture Meter

Moisture 2 Hi All,

Sadly,  I had a death in the tool box last week. after one too many drops, my old moisture meter finally gave up.

So after a suitable period of mourning, (about 12 seconds) I decided to update to to the new Profi scale moisture meters by Burg Wachter that arrived in the shop last week.


Whats cool about these meters is that as well as measuring the moisture level of wood you can quickly change the settings so you can measure the moisture content of plasterboard, (drywall) screed and gypsum as well as ambient temperature in Celsius and Fahrenheit.

The tech specs for the moisture meter is shown here:

Technical data

Measurement range Wood: 4 – 60 %Moist 3
Solid materials: 0.2 – 3.0 %
Resolution Wood: 1 %
Solid materials: 0.1 %
Accuracy Wood: < 30 %: ± 2 % ≥ 30 %: ± 4 %
Solid materials: < 1.4 %: ± 0.1 %
≥ 1.4 %: ± 0.2 %
Power supply 4 × 1.5 V (e. g. LR44)
Optimum ambient conditions 0 °C – 40 °C, air humidity: < 85 %
Storage temperature -10 °C – 50 °C,
air humidity: < 85 %


When I use a  moisture meter I’ll always  take  a number of readings from different points on the timber then work out an average. The meter was simple to use moisture 1and  when I measured the same point in the
timber 4 times I got the same read every time, ( unlike my old meter)

Also in the manual is this handy table which give you a rough idea of how to interpret the data from the meter.

Humidity content in weight percent
Humidity status Wood        Screed, gypsum, plaster
Inoffensive 2 – 15 %              0,2 – 0,3 %
Borderline 15 – 19 %            0,4 – 0,9 %
Too humid > 20 % > 1,0 %

Please keep in  mind when using this scale that it’s only a general idea. Moisture content varies between species and where you are in the world. Remember to take multiple readings and work out an average.

What I also love about this meter is the size, (See photo below), and the price.

moisture 4At under $40.00 (AUD) its an absolute bargain for all the features it has. If you’re in the market for a new meter have a look here.

Thats all for now guys, as always be safe and have fun,

Cheers

Bryan


The Festool CT 17E Extractor

Hi Guys,

I’ve finally had a chance to put pen to paper and complete my write up of the new CT 17E extractor.

It’s one of the Protool to Festool conversions and has evolved from the Protool VCP 170E. I found to be an excellent and highly efficient machine and to date has performed all the work I’ve expected of it with no hiccups at all.

Click on this link  The CT17E Extractor to read my full review of this awesome little machine.

One of the best features of this machine is the price. at under $450 (AUD) with a 36mm hose and cleaning set it’s an absolute bargain. Click Here to check out the CT 17 on the Just Tools website.

In all honesty, if you’re on a budget an want a small fully featured extractor for under $500 you cant go past this!

As always, thanks for reading and feel free to post any questions of comments.

Be safe and have fun.

Cheers

Bryan


The New Festool Conturo, (no, it’s not an armchair)

conturo
In keeping with their  philosophy of thinking outside the box Festool has again demonstrated that they’re the most innovative tool company on the planet with the release of their new edge banding system,  the Conturo
The Conturo allows for the easy and clean application of a variety of thicknesses and widths of edge banding (lippings)  to all types of manufactured timber boards including ply, mdf & chipboard.
As well as handling straight edges the contour easily applies branding to bevels, internal and external curves.

The attached videos from Festool UK will help you explain the machine in greater detail so if you’re interested please take the time to watch them

Introduction


Applying edging.

Applying edging to curved surfaces,

Edge Banding internal Corners/

The Conturo has been released in the UK and from what Ive heard it’s doing fairly well there. Festool Australia have advised me that they don’t have a release date or pricing yet, but looking at the UK pricing I’d guess that it will retail for around the $3900 to $4450 mark.

Like all Festool Tools it’s got a fairly hefty price but looking at what the tool can do it’s sure to be a time saver, particularly on site.

As more information comes to hand I’ll post it on this site so watch this space…..

As always your comments and questions are appreciated . Thanks for reading.

Be safe and have fun.

Cheers

Bryan

Festool Hand Sanding Pad


Hand sanding pad

For those occasions when an electric sander is too aggressive or when you’re sanding delicate materials such as small mouldings, the hand sanding pad, (Festool part # 495966) is an absolute gem.

The pad features a Velcro backing which wraps around the piece and easily accepts all styles of 150mm diameter abrasives. I’ve teamed it up with the new series of Granat papers to sand small timber mouldings up to 1500 grit for a project I’m working on and have been extremely satisfied with the results to date.

Available as either a hard or soft pad and selling for under $40.00 they’re a worthwhile addition to your sanding kit.

As always, your questions and comments are appreciated

Be safe and have fun,

Cheers

Bryan

TS55R & CMS Module

Hi Guys


Todays post is all about the new CMS module for the TS55R plunge saw. For those of you who aren’t familiar with the CMS system, it is in essence a Triton workcentre on steroids.

It offers a really accurate and easy to use module for the TS55R saw, a module for the PS300, 400, and hopefully PS420, jigsaws, a linisher module and possible the most outstanding router table on the market today, the CMS-OF, which fits all of Festool’s routers. though, my personal favourite is to use it with the OF 2200.

Please watch below to see the Wood Whisper’s video review on the CMS router table.

I had fun with the CMS TS55R unit but must admit to being a bit perplexed by the lack of clear assembly instructions and the inclusion of components from the old CMS TS55 Module

Please click here, (CMS TS55R) to read my full article.

As always, your questions and comments are appreciated.

Be safe and have fun

Cheers

Bryan

Lie Nielsen Australia Hand Tool Event

Hi Guys,

If your serious about your woodworking, as well as your power tools I’m fairly certain that you’ll want to add a few of the outstanding Lie Nielsen hand tools to your collection. For those of you who aren’t aware of Lie Nielsen they are regarded as the “Festool” of hand tools. As a proud owner of a couple of Lie Nielsen planes, from personal experience I can vouch for the fact that they’re awesome to use.

This weekend, (the 7th and 8th of July) Lie Nielsen Australia are holding a hand tool event at the RMIT University School of design which is located in Building 73, Orr st South Carlton 10am to 4 pm .

To view the Lie Nielsen Australia website please click here. 

Also at the  show will be Chris Vesper, who makes the best squares and sliding bevels that money can buy, as well as Julian Pratt and lots of demonstrations.

With special show pricing you’ll certainly be able to get a few bargains

I’ll be popping town on Saturday afternoon so we may catch up there.

As always, be safe and have fun

Cheers

Bryan

Sometimes you’ve just got to build something…..

If you’re like me, and have limited time in the workshop, working on a large scale project like the wall unit I’m building at the moment can get a bit frustrating.
Don’t get me wrong; I’m loving the challenge of hand building a large unit, dovetailing drawers and solving the multitude of problems that can occur when building large carcasses from solid timber, but when you only have maybe one day a week to fully devote to the project, the the finish line can seem a long way off and all those other smallish jobs that you need to get done get pushed further and further back.

So with a week off the day job I decided to have a hiatus from the wall unit and tackle a couple of small jobs that I could start and, hopefully finish in seven days.

The first small job was a much needed reorganization of the workshop and a bit of a re-jig
In the way I kept my tools.
I’ve been reading a bit of Christopher Schwartz’s blog at Lost art Press where he discusses that with 50 tools you can build just about anything, and taking a leaf out of his book, decided to build a tool chest / cabinet.
Now if you’re anything like me, you have a lot of tools to play with so my first task was to work out which ones I use all the time, which ones I use some of the time, and which ones I have no idea why I have!
The sorting now done, I now laid them all out on the bench and started planning. I decided to build a wall cabinet, rather than a chest because I have more free wall space rather than floor space and, well, my backs not getting any younger either!
I’m fortunate to have a large supply of timber in hand so the plan was to build the unit entirely from off cuts and leftover timber from other projects..
Anyway, to cut a long story short, the finished cabinet shown below took four days to complete and has made life in the workshop a whole lot easier.
If tool storage is a problem in your workshop I’d highly recommend that you make your own cabinet of tool chest. If you do, please send me a photo and I’ll post it on the site

That’s all for now, as usual your questions and comments are appreciated

Cheers
Bryan

20111028-070906.jpg

Blog at WordPress.com.

Up ↑