Sometimes you’ve just got to build something…..

If you’re like me, and have limited time in the workshop, working on a large scale project like the wall unit I’m building at the moment can get a bit frustrating.
Don’t get me wrong; I’m loving the challenge of hand building a large unit, dovetailing drawers and solving the multitude of problems that can occur when building large carcasses from solid timber, but when you only have maybe one day a week to fully devote to the project, the the finish line can seem a long way off and all those other smallish jobs that you need to get done get pushed further and further back.

So with a week off the day job I decided to have a hiatus from the wall unit and tackle a couple of small jobs that I could start and, hopefully finish in seven days.

The first small job was a much needed reorganization of the workshop and a bit of a re-jig
In the way I kept my tools.
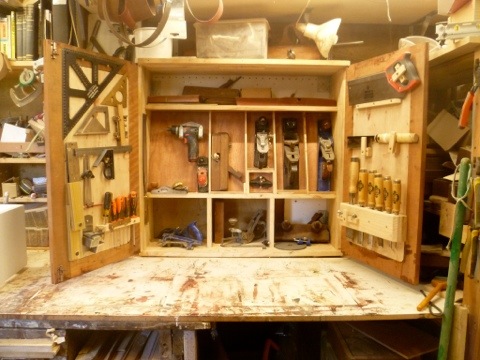
I’ve been reading a bit of Christopher Schwartz’s blog at Lost art Press where he discusses that with 50 tools you can build just about anything, and taking a leaf out of his book, decided to build a tool chest / cabinet.
Now if you’re anything like me, you have a lot of tools to play with so my first task was to work out which ones I use all the time, which ones I use some of the time, and which ones I have no idea why I have!
The sorting now done, I now laid them all out on the bench and started planning. I decided to build a wall cabinet, rather than a chest because I have more free wall space rather than floor space and, well, my backs not getting any younger either!
I’m fortunate to have a large supply of timber in hand so the plan was to build the unit entirely from off cuts and leftover timber from other projects..
Anyway, to cut a long story short, the finished cabinet shown below took four days to complete and has made life in the workshop a whole lot easier.
If tool storage is a problem in your workshop I’d highly recommend that you make your own cabinet of tool chest. If you do, please send me a photo and I’ll post it on the site

That’s all for now, as usual your questions and comments are appreciated

Cheers
Bryan

20111028-070906.jpg

Working With Wood Show, Melbourne 2011. Day 1

Well it’s here again. It doesn’t seem like 12 months has passed since the last gathering of the wood brethren in Melbourne but here we are.

Today is set up day, which usually means a 12 hour day lugging power tools into position, hanging accessories and trying to decide if we’ve actually bought the right mix of stock.
In a rare feat of brilliance, my boss decided that well do the show this year with Bosch and fein as well Festool who we usually exhibit with.
For you guys out there after a bargain, there will be some good ones to be had.
As I have a chance to explore the show over the next few days I’ll keep you updated with any blog worthy new products including the brand spanking new cordless Fein multi master.

Anyway that’s all for today, as usual feel free to ask question or post comments

Cheers

Bryan

I’ve added a few

Cool New Festool Products

Hi Guys,
Check out these excellent videos of new festool products including the new DF700 domino and the new T15.6 impact drill driver.
The address is vimeo.com/27335311
Cheers

Sanding Speeds


When sanding timber, another tool in your finishing arsenal is the variable speed control on your random orbital sander.

When I’m talking to clients who are looking at buying a sander, one of the things I’ll talk about very early in the discussion is the benefit of speed control when sanding.
The main points that you need to remember are, the coarser the paper the higher the speed; the finer the paper, the slower the speed.

Coarse paper on slow speed tends to dig in and ‘bite’ the work, which can lead to scratches, and swirls, which are bloody hard to get out. Coarse paper on high speed tends to ‘skim’ over the work and while it may take a little longer you’ll achieve a more controlled result.

Fine paper at full  speed  “floats” over the surface requiring more pressure to achieve any result, and more pressure increases the risk of swirl marks.  Fine paper at slow speed has even contact with the work piece and requires minimal pressure to achieve a top result.

When you start sanding and are using, for instance a 40 or  60-grit paper,  start with the sander on speed 6.  As you start moving into progressively finer grades, gradually begin to lower the sander speed. Use the chart below as a rough guide for sander speed related to sanding grit.

Sanding grit.     Speed
40.                       6
60.                        6
80.                       6
120.                       5
150.                       5
180.                       5
240.                       4
320.                      4
400.                      3
500.                       3
800.                       2
1000.                     2
1200.                    1
1500 & finer           1

This chart is a suggested range only and results can vary depending on the type of timber that you choose and the mechanics of your sander.

 (150mm diameter abrasives up to  4000 grit are available from  most Festool dealers. Papers listed here are from the Brilliant 2 and the Titan range.)

The transition point when sanding is 400-grit.

This is the stage where you stop sanding the timber and start burnishing it. From 400 up you’ll start to see the surface of the timber develop and become smoother with every sanding stage that you complete.

 Don’t forget to feel the timber as you sand it so that you become more familiar with how each sanding grade contributes to the overall finish if the surface.   When you reach 1200 grit, you should see the timber surface begin to develop a lovely lustre and the surface will begin to shine. This happens, because the flour, (really, really fine sawdust) which is created by the super fine grits that we have been using is filling and closing the pore of the wood, burnishing the surface and giving us this glass like finish.

As an exercise, try using this method on different species of timbers to see how their various surfaces develop. I’ve used this method on both hard and softwoods with consistently good results
Jump in and have a go at this sanding method.  There are many ways to finish and use your sander and what I’ve discussed here is the method that works for me.

Drop me an email if there’s and areas you need clarification on or, let me know how you found this method.

Simple Sliding Dovetails

sliding dovetails master pdf

Hi All,

Please follow the link  shown here for a quick tutorial of the method I’m using to make sliding dovetails. I’ve used  extensively and found that with practise you can make them quickly and most important, accurately.

This, by no means is the only way to make sliding dovetails but for me it works.

If you’ve got any questions either leave a comment or shoot me an email.

Hope you enjoy it

Cheers

Bryan

Work in Progress

Hi all,
It’s been a while since I updated this blog and for this I apologise, but life sometimes throws you a few curve balls. Between family commitments, a death in the family, and the bloody flu I’m scratching my head as to where this years gone.

Anyway, enough of that. I’m nearly finished an article on the Rotex, sanding techniques and an easy way to make sliding dovetails. I’ll also be giving you all heads up on new tools as they come out on the market.
There’s now an email subscription link on the page so be sure to register so you’ll get an automatic update when I add new content.
As always, comments and questions are appreciated and if you’ve got a problem with a project, drop me an email and we’ll see if we can nut it out.
Anyway, thats all for now.

Cheers

Bryan

Hello world!

Well, I’ve finally done it, made my first foray into the blogosphere. For better or worse here we go.

This blog is all about wood, woodworking, tools and other cool stuff.  I’ve been a passionate woodie for over 25 years and and now working full time selling power tools for one of Melbourne‘s premium tool shops. Over the years I’ve built and sold furniture full time , run a picture framing gallery and have been the national training manager for a major power tool company.

I want to keep this blog interesting, as well as informative and as well  as some technical and how to articles I’ll also be posting info on new tools as we se them in the shop.

I’ll also be trying to offer some objective advice on what power tools are  good and what, well, maybe needs a bit more development, so you can go to the tool shop with confidence when it’s time to upgrade the kit.

Above all else, please ask questions. As a trainer whose run too many power tool and woodwork training sessions to think about, I always remember the classes whose participants asked lots of questions as being the most enjoyable sessions.

Anyway guys, thats all for now

Cheers

B

Create a free website or blog at WordPress.com.

Up ↑