The Festool APS 900 Jig, making a masons mitre joint.

image


The Masons Mitre,

With its roots in stone masonry the masons mitre joint has evolved a commonly used joint in kitchen renovation where it is used to join bench tops together at a 45 degree angle

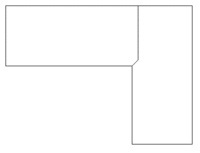
The masons mitre was originally used where two stone members met at a 45 degree angle and it was created by removing a small section of material from one part, thereby creating a socket for the other.
In masonry terms, this allows the bond of the masonry courses to to continue around a corner without a staggered vertical joint and and allows the mortar to truly bed into the corner of the joint.

In the cabinetmakers world the masons mitre allows for a strong and attractive joint, particularly on bench tops with rounded edges, and saves on the wastage of materials and additional labor costs that would result from the removal of large triangular sections that need to be cut in a traditional mitre joint.

The masons mitre joint can be a it of a challenge, but with a bit of practise and good jig for your router it’s quite achievable.

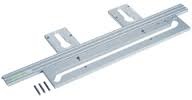
One of the best jigs I’ve used to achieve this joint is the APS 900 jig which is made by Festool. Whilst it looks a bit complex it’s actually fairly straight forward and gives you accurate and repeatable results.

Have a look at the video here from Festool TV where Festool demonstrator Frank Jaksch shows the how to use the APS 900 along with a Festool OF 2200 router to create a masons mitre joint.

It is dubbed in English and the picture is a bit dodgey at times but please persist, it is worth watching.

Anyways guys, I hope you enjoyed the video and if your not using it already, will soon be adding the masons mitre to your arsenal of joinery.

Thanks for reading and as always your comments and feedback are appreciated.

Be safe and have fun,

Cheers

Bryan

20130705-101513.jpg

The Protool CSP 132

20130619-064511.jpg

Hi All,

The beastie in the photo is the Protool CSP 132 Carpentry circular Saw and if you’ve ever got the need to cut timber up to 130 mm thick, this is the tool for you.

I had the opportunity to get in one of these massive saws for for one of my regular customers last week, so as it’s really uncommon, I took the opportunity to grab a couple of pictures to show you all.

The specs for the saw are:

Cutting depth 50-132 mm
Rated input 2300 W
Saw blade diameter 350 x 30/3,5 mm
Mitre cutting 0-60 °
Rated Speed (no-load) 2200 min-1
weight 18 kg

20130619-065212.jpg

Whilst it’s not the tool for everyone you have to admit that it falls into the ” really cool tool category”.

Contact me if you want any more information about this or any other tools.

As always, be safe and have fun.

Cheers,

Bryan

How Much Festool Fits in an A Class Mercedes?

Hi All,

One of my semi regular customers walked into the shop yesterday with a good sized Festool shopping list to replace the tools he’d had knocked off some weeks previously. I’d had a chat to him a few times about what he needed so after a little bit more discussion he settled on a MFT3 table, TS55 with Rails, T15+3 set version, CT26 Extractor, PS420 jigsaw, OF 1400 Router, an assortment of Systainers and one of the new Systainer trolleys to cart it all around on.
Once I’d assembled a small mountain of tools, the warranty forms had been completed and payment made I asked him where his car was and he pointed to one of those tiny older style Mercedes A class cars sitting in the car park. (See the photo below so you know the style I’m talking about.

20130608-070756.jpg

I looked at him and said, ” Peter, that ain’t going to fit”). He just smiled and said “watch”.

Lo and behold after about 5 minutes and a bit of creative packing we got. It all in.

20130608-072031.jpg

Enjoy yourself Pete !!!!!!!

Thanks for reading, as usual, be safe and fun

Cheers

Bryan

Site Update, it’s now easier to find stuff!!!!

Hi All,

Well, a couple of things to cover today. Firstly, the Festool sale at Just Tools last Friday and Saturday went gangbusters. I’m off work today with a rotten dose of the Flu so I havent seen the final wash up but I reckon that close to 100 tools went out through the door and over the web during the two day period. It was good to catch up with everyone and on behalf of the sales team at Just Tools I’d like to say thanks for your support.

I’ve updated the theme on the site today which will make it a bit easier to track down particular articles. If for instance you’re looking for information on the Rotex, click on the “about” button and on the right side at the top there’s a category header with a drop down list showing all the article categories on the site. Click on the Rotex Tab and all articles on the Rotex will be listed.

When viewing the site on a mobile device the category list is at the bottom of the “about” page.

Please let me know if you like the new format, I’d love to hear your feedback.

Anyway guys, Ive got lots more articles in the pipeline so watch this space.

As always, be safe and have fun,

Cheers

Bryan

Festool Hand Sanding Pad


Hand sanding pad

For those occasions when an electric sander is too aggressive or when you’re sanding delicate materials such as small mouldings, the hand sanding pad, (Festool part # 495966) is an absolute gem.

The pad features a Velcro backing which wraps around the piece and easily accepts all styles of 150mm diameter abrasives. I’ve teamed it up with the new series of Granat papers to sand small timber mouldings up to 1500 grit for a project I’m working on and have been extremely satisfied with the results to date.

Available as either a hard or soft pad and selling for under $40.00 they’re a worthwhile addition to your sanding kit.

As always, your questions and comments are appreciated

Be safe and have fun,

Cheers

Bryan

Rotex + Granat + Marble = Wow

Hi Guys,

festool granat abrasive

I apologise for it being quite a while since I updated the site, but I’ve been busy behind the scenes working on an upcoming book on trammel routing and an E-book on the Rotex. Today’s post is all about the new Festool Paper “Granat” which would have hit the shelves at your local Festool dealer a few months ago.  I hadn’t had a lot of time to test it until an opportunity presented itself recently where a client of mine had a problem with some marble that needed some love and Granat proved the perfect solution.

Read the full article with the technique on how to polish stone with Granat here.

This new hybrid abrasive is impressive and I’ve found that it lasts nearly twice as long as Brilliant and Rubin on timber, Corian and stone.

Have a read and let me know what you think.

As usual, your questions and comments are appreciated.


Be safe and have fun,

Cheers

Bryan


Sharpening Hints


One of the more common questions I get on a weekly basis in the shop has to do with the best was to sharpen hand tools. We have the Tormek T7 and T3  sharpening systems the shelf and whilst they’re excellent units, the price does end to put a lot of people off.

I’m a hand sharpener and use a combination of diamond plates, Japanese water stones and a leather strop to sharpen all my chisels and hand plane blades.

If I’m reworking a very dull chisel I’ll usually start with a coarse diamond plate of around 320 grit which is particularly good for removing any nicks or small chips from the blade.
I’ll then move up to a 600g, then an 800 plate, 1200 plate and a 2000g plate. From there I move up to a 4000g Japanese water stone and then finish with a leather strop dressed with honing compound. At every stage of sharpening I always sharpen the bevel, then flip the tool over and flatten the back.

I find that this process gives me a uniform mirror finish on the tool which stays sharp for a long time,( depending on the timber).

The biggest issue nearly all of us have had when learning to sharpen is to figure out the best way to set the angle of the chisel or plane blade so that we can get accurate and repeatable results. There are a mountain of jig systems available to help you set the angle but I’ve found that a simple jig which you can make up yourself offers one of the best and most cost effective solutions available.

The plan for the Deneb Puchalski Angle Setting Jig features on the Lie Nielsen Australia website, but for convenience you can click here for a direct link to the plan and here for a direct link to the really useful Lie Nielsen sharpening guide.

As always your questions and comments are appreciated.

Be safe and have fun

Cheers
Bryan

Trammel Routing with the OF 1010, (part 2)

Hi Guys,

After the success of last weekends foray into Gothic Trammel routing, I had a bit of free time this weekend to further refine the technique. The purpose of this exercise is twofold, firstly to see how far you can go with trammel routing, and secondly to create and refine some different router techniques for a upcoming book.

Last week I made a Gothic Trefoil Frame so this week I decided to attempt a Gothic Quatrefoil motif.


I remembered to take the camera into the  workshop this week, so I could document the process.

The  first step is to prepare the panel. There is a process to this which i’ll cover in more detail in future articles

Once the panel is prepared, the next step is to draw the design using a compass and rulers.


The next stage is to drill a small hole to accommodate the shaft of the trammel. the router and trammel are then placed on the workpiece and the plunge depth is set as per normal. I’m using 19 mm pine for this test piece but will only be cutting the design in 18mm deep, (it’ll make sense later) the inner line of the small circles are cut first and the position of the cutter is is determined by sighting the edge of the cutter to the pencil line.

Once your set carefully start cutting.


Cut each circle to the maximum depth before moving on to the next one. The trammel is visible in front of the router in the photo above.


Once you’ve completed the inner set, move out to the next set of rings taking care to stay within the design.


When you’ve done all the straight cuts, change to a face cutting profile bit and add some detail as I’ve done on this example.

The next step is to put a scroll cut blade on your jigsaw and carefully cut the frame from the panel.

Once thats done your piece will probably look like this


Dont stress, we now turn the frame over and put a bearing guided flush trim cutter in your router or trimmer, and set it as shown below


Carefully trim all edges and you’ll hopefully end up with something that resembles this,


Now all it needs is a good sand and finish according to your taste.

Ok guys, thats all for this post, they’ll be more on this topic in following posts leading up to my routing book which will hopefully be ready in the next few months

As always, your comments and questions are appreciated.

Be safe and have fun,

Cheers

Bryan.

Lie Nielsen Hand Tool Event Photos

Hi All,

I spent a few hours yesterday down at the Lie Nielsen Australia hand tool event at the RMIT furniture workshops in Orr st, South Carlton where the irrepressible David Eckert, from   Lie Nielsen Australia and Henry Eckert fine tools and Chris Vesper, of  Vesper Tools are displaying and selling their outstanding ranges of tools.

Hopefully the photos below will wet your appetite and you’ll be able to get down there before they close at 3pm today, (Sunday)

Some offerings from Chris Vesper!

An assortment from Lie Nielsen

More  from Lie Nielsen

Hand Plane Heaven !!!!!

I hope that you like the photos and if time and your budget permits, that you get the chance to go and have a look. Otherwise, follow the highlighted links above to go to both the Lie Nielsen, Henry Eckert and Chris Vesper Websites and browse their collections at your leisure.

I feel that one of the keys to enjoying your woodwork is to find the right balance between hand and power tools. Adding pieces from the collections shown above will certainly go a long way in helping you achieve that.

As always, your questions and comments are appreciated.

Be safe and have fun,

Cheers

Bryan

Lie Nielsen Australia Hand Tool Event

Hi Guys,

If your serious about your woodworking, as well as your power tools I’m fairly certain that you’ll want to add a few of the outstanding Lie Nielsen hand tools to your collection. For those of you who aren’t aware of Lie Nielsen they are regarded as the “Festool” of hand tools. As a proud owner of a couple of Lie Nielsen planes, from personal experience I can vouch for the fact that they’re awesome to use.

This weekend, (the 7th and 8th of July) Lie Nielsen Australia are holding a hand tool event at the RMIT University School of design which is located in Building 73, Orr st South Carlton 10am to 4 pm .

To view the Lie Nielsen Australia website please click here. 

Also at the  show will be Chris Vesper, who makes the best squares and sliding bevels that money can buy, as well as Julian Pratt and lots of demonstrations.

With special show pricing you’ll certainly be able to get a few bargains

I’ll be popping town on Saturday afternoon so we may catch up there.

As always, be safe and have fun

Cheers

Bryan

Blog at WordPress.com.

Up ↑